Activity Name:
Heart Rate Monitor
Grade Level:
The activity is targeted for grade 7, but could work for grades 5 to 8.
Time Required:
120 minutes (approximately 2 class periods)
Expendable Cost:
None
Group Size:
Work in pairs
Subject area:
science, technology
Summary:
Students design and build a heart rate monitor using the gator:particle sensor, micro:bit, and gator:bit. Students explore how they can raise and lower their heart rate through different activities and what that means for how hard their heart is working. Students augment their heart rate monitor with additional signals such as when their heart rate reaches different thresholds. This can work in a life science unit looking at anatomy and physiology, a physical education class looking to integration computation, or in a STEM class where students build wearable technology.
Keywords:
micro:bit, heart rate, physical activity, sensors, middle school, coding
Educational Standards:
ISTE
- Computational Thinker 5b
- Students collect data or identify relevant data sets, use digital tools to analyze them, and represent data in various ways to facilitate problem-solving and decision-making.
NGSS
- MS-LS1-3: Use argument supported by evidence for how the body is a system of interacting subsystems composed of groups of cells.
- SEP 3: Planning and Carrying Out Investigations
- MS-PS2-2: Plan an investigation to provide evidence that the change in an object’s motion depends on the sum of the forces on the object and the mass of the object.
Prerequisite Knowledge:
Students should have some experience programming the micro:bit. Provided they have worked through some of the tutorials on the MakeCode website they should be able to complete the activity.
Learning Objectives:
- Students make the connection through an investigation that their heart works harder when their body is working through physical activity and their emotions (i.e. being anxious for a test causes their heart rate to rise).
- During the investigation students collect and display the relevant heart rate information using numbers, sounds, and lights.
Materials List:
- micro:bit
- USB cord
- Power supply (micro:bit battery pack should be sufficient)
- SparkFun gator:bit
- gator:particle
- 4 alligator clips
- Computer or tablet capable of flashing code to micro:bit
Introduction / Motivation:
[Download an app on your smartphone and/or use your fitness watch, really anything that can track your heart rate]. How many of you have ever checked your pulse in gym class? Have you ever wondered why sometimes it feels like your heart is racing? Why do you think it was happening? [Hopefully at least a few students will be in agreement, offer up some anecdotes]. Well that’s one of the things I use my smart watch for. It lets me monitor my heart rate (how many times my heart beats per minute) and see how it changes throughout the day. What do you think happens to your heart rate throughout the day? [some possible students responses… stays the same, goes up if I have a test, goes up when I walk home, goes down I sleep at night]. We can actually build our own heart rate monitor and figure out what is happening.
Procedure:
Background
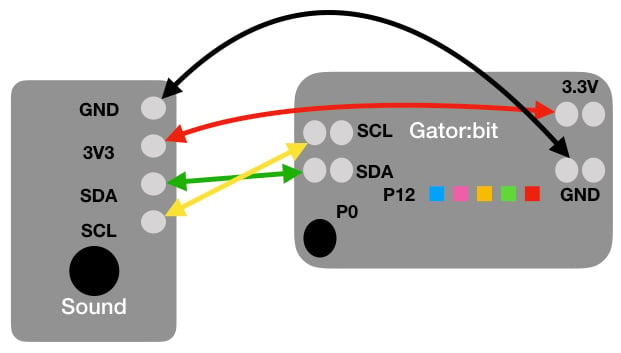
Make sure you are familiar with the different capabilities of the gator:bit and micro:bit. The main ones to focus on here are the different ways to represent information using the 5 LEDS on the gator:bit controlled by pin P12, the speaker controlled by pin P0, and the 25 LEDs on the micro:bit itself (see Figure 1). In addition, make sure you are familiar with the gator:particle sensor and how to wire it (see Figure 2). There are three blocks for controlling the gator:particle (see Figure 3). The main thing to remember is to connect the ground wire first to prevent any incomplete circuits. Incomplete circuits can cause parts of the system to heat up.
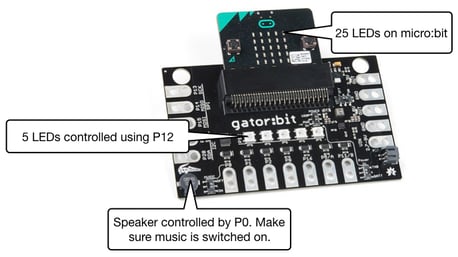
Figure 1: Ways to use the gator:bit/micro:bit to represent information.
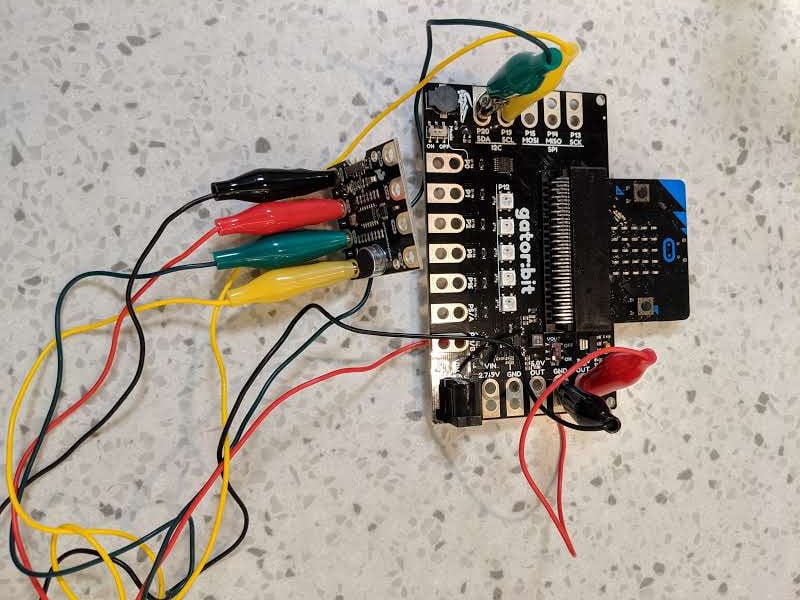
Figure 2: Wiring diagram for the gator:particle and an actual picture of the wiring.
Before the Activity
- Separate all the materials so that each group has all the parts they need.
(I recommend printing out the wiring guidelines in this)
- Write up the URLs for the tutorial on big stickies, whiteboard, share them on Google Classroom, etc.
- Print the gator:particle sensor activity sheet that guides students through the activity
With the Students
- Divide the class into pairs and make sure each pair has a set of the materials
- The first step is to wire the sensor so students can start taking measurements. Have students wire their gator:particle using the wiring diagram in Figure 2.
- Confirm that students have wired the sensor correctly by having them share their wiring configuration with another pair of students.
- The first project that students will code gets them familiar with the heart rate sensor. They display the heart rate on the micro:bit and have the 5 LEDS on the gator:bit blink according to their heart rate. Students can achieve this by pausing for the length of time equal to the heart rate (i.e. if my heart rate is 70 then I pause for 70 milliseconds for each blink).
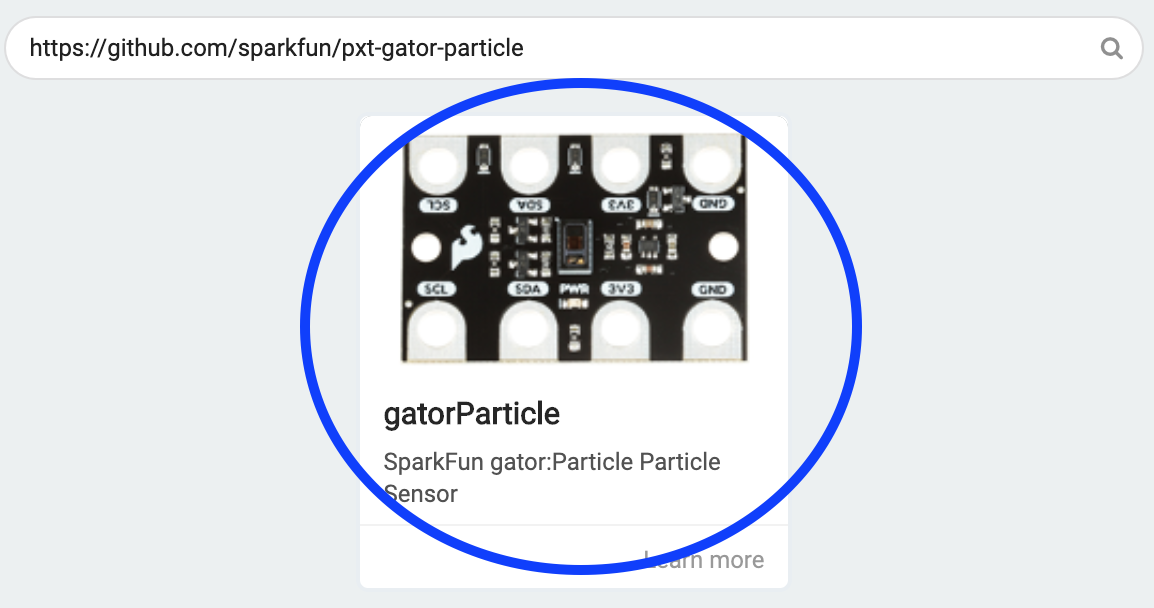
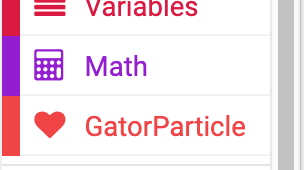
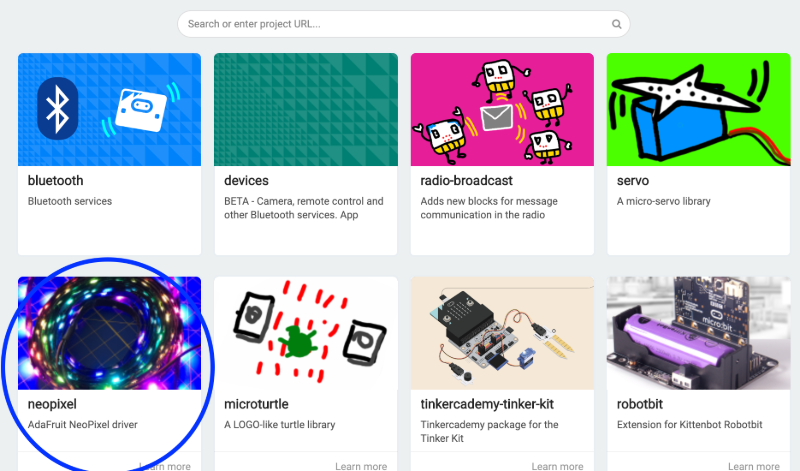
- For more experienced coders, they can create a new project on MakeCode and import the sensor library by going to Extensions and searching for this repository (see Figure 4). For students who are less experienced, they can start with this tutorial that imports the libraries and the blocks they need for them.
Figure 4: Sequence of moves in MakeCode to add the gator:particle.
- Once students have their initial program coded, they should test it out to see what they can do to make their heart rate change. Encourage them to sit still and take some deep breaths, run up and down the hallway and then check, etc. To test, it is important that you place the sensor against your skin with the highlighted portion in Figure 5 touching your skin. It works the best when you place your finger tip over this part. See this video for a working example. This is the MakeCode project for the example.
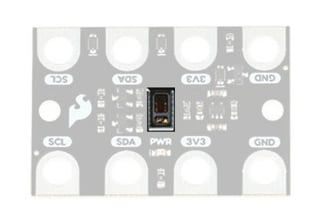 Figure 5: The actual sensing part of the sensor. Place your finger tip over this for the most accurate readings.
- Bring the class together and have them list the different activities they did and how that affected their heart rate. Do you think it would be useful to get alerts if your heart rate gets low or high?
- Students get to design their own heart rate monitoring system. If students are familiar with the different options for display on the gator:bit and micro:bit, they can proceed to making a design plan.
- Show students the different options they have for creating their heart rate alert system. This can be done by showing one you created yourself or just illustrate the different features on the gator:bit/micro:bit as shown in Figure 1.
- Before students start to code their heart rate monitoring system, they need to make a design plan. Use the activity sheet for students to plan their design.
- Now students code their design. Again experienced students can create a new project on MakeCode and import the gator:particle library by going to Extensions and searching for this repository (see Figure 4). If students want to use the LEDs on the gator:bit they should import the neopixel library (see Figure 6). For less experienced students and students who need extra help, they can use this tutorial which imports the necessary libraries and gives them a set of blocks to work with. This is the MakeCode Project for an example solution.
Figure 6: Sequence of moves in MakeCode to add the neopixel library
- Once students complete their programs, have them test it out.
- Students conduct design share outs where they explain their design choices. It is important here for students to actually interact with each other’s designs and see if they work on other people. Some suggested strategies for doing this are:
- Have pairs partner up and share with each other
- Break the pairs in half and do a gallery walk. Then have the pairs swap.
- Have each group present their heart rate alert system to the class.
- After seeing each other’s designs, have students answer the last question on the activity sheet. These questions help them think about how their design changes depending on the context.
- Finish with a brief, whole class discussion on struggles the students had completing the tasks and how they overcame them.
Troubleshooting Tips:
- Coding
- For students with less programming experience. Use the tutorials linked in the instructions that limit the blocks the students see to just the blocks they might need.
- The correct length of time to pause for the blinks can be tricky. Too little and it just looks like flashing, too much and it doesn’t seem representative of the heart beat. The calibration part will usually be much easier for the students than when they have to make their own display. I found that using the formula 500ms - bpm worked well to illustrate the heart rate.
- Students tend to struggle with the logic blocks and it can be worthwhile bringing the group together to go over the creation of an if/then/else statement where they compare noise levels.
- If students are very new to coding, walking through at least part of the tutorial as a class can get students on the right track
- gator:particle
- If students do not make good contact with the sensor and their fingertips, the reading will be off and/or potentially 0.
- Using the neopixel LEDs can sometimes cause strange readings or no reading of the gator:particle. If you see this happening, I recommend only using the speaker and the LEDs on the micro:bit for the display. The issue seems to be related to power, but I have not found a foolproof solution as of yet.
- Wiring
- Make sure that students follow the diagrams
- Make sure that students all ALWAYS connecting the ground wire first
- Don’t have students connect the batteries until they have tested the code when the micro:bit is powered using the USB cord.
- It helps to give students wires that match the colors on the diagram or at least red and black alligator clips for power and ground.
- Displays
- Remind students which pins control the sound (P0) and neopixel LEDs (P12) on the gator:bit
- If using the speaker on the gator:bit, make sure that the music switch is on the on position (it’s right by P0).
Going Further:
- Since individual data points can be incorrect, have students take three consecutive measurements and compute the average.
- Have the students send their heart rate over the radio to a partner. Have the partner guess the activity they are doing.