Activity Name:
Light and Music Show
Grade Level:
7 (Could work for 5-8)
Time Required:
180 minutes (approximately 2-3 class periods)
Expendable Cost:
$0
Group Size:
2
Subject area:
science, technology
Summary:
Students design a light and music show that is controlled using the gator:environment sensor, which will measure things such as temperature, humidity, and carbon dioxide. The students begin by using one value collected by the sensor, such as temperature, to control sequences of lights and sound. They then augment their project using multiple values collected by the sensor (i.e. temperature and humidity). Students must use at least two different values. This would work well in a class that has some optional project work at the end. Students will be able to complete simple shows in the 3 class periods for this activity, but there is a lot of room for personalization and continued development for interested groups of students.
Keywords:
micro:bit, gator:bit, gator: environment, environmental sensor, middle school, coding, music, lights
Educational Standards:
ISTE
- Innovative Designer 4c
- Students develop, test and refine prototypes as part of a cyclical design process.
- Computational Thinker 5d
- Students understand how automation works and use algorithmic thinking to develop a sequence of steps to create and test automated solutions.
- Creative Communicator 6b
- Students create original works or responsibly repurpose or remix digital resources into new creations.
NGSS
- SEP 4: Analyzing and Interpreting Data
- MS-ETS1-3: Analyze data from tests to determine similarities and differences among several design solutions to identify the best characteristics of each that can be combined into a new solution to better meet the criteria for success.
- SEP 8: Obtaining, Evaluating, and Communicating Information
- MS-PS4-3: Integrate qualitative scientific and technical information to support the claim that digitized signals are a more reliable way to encode and transmit information than analog signals.
- MS-LS1-8: Gather and synthesize information that sensory receptors respond to stimuli by sending messages to the brain for immediate behavior or storage as memories.
Prerequisite Knowledge:
Students should have some experience programming the micro:bit. This project requires more familiarity with variables and if/then/else statements. Ideally, students will have some understanding of these topics through other programming environments or previous MakeCode activities. Students should be comfortable with the rock paper scissors tutorial on the MakeCode website. Additionally students should be comfortable exploring unknown blocks and experimenting to figure out how they work.
Learning Objectives:
- Students iterate on their light and music show at least once based on feedback from the class and their own developing understanding.
- Students develop an automated light and music show that displays information about the environment.
- Students create original compositions and sequences of lights to create a light and music show using the values obtained from the gator:environment to control the display.
Materials List:
- micro:bit
- USB cord
- Power supply (micro:bit battery pack should be sufficient)
- gator:bit
- gator:environment Sensor
- 4 alligator clips
- Computer or tablet capable of flashing code to micro:bit
Introduction / Motivation:
(Begin by showing at least a couple minutes of the symphony of lights in Hong Kong.) What did you notice about the video? How do you think they are creating something like this? (Get kids excited and thinking about how to create something similar.) Today you get to design your own light and music show.
Procedure:
Background
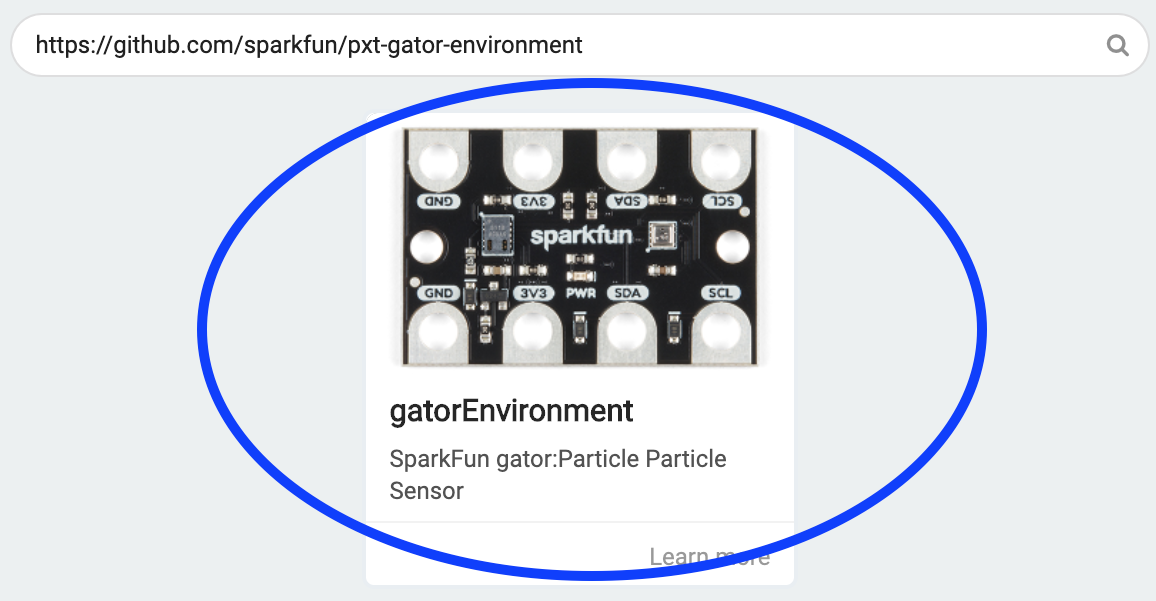
Make sure you are familiar with the different capabilities of the gator:bit and micro:bit. The main ones to focus on here are the different ways to represent information using the 5 LEDS on the gator:bit controlled by pin P12, the speaker controlled by pin P0, and the 25 LEDs on the micro:bit itself (see Figure 1). In addition, make sure you are familiar with the gator:environment sensor and how to wire it (see Figure 2). There are two blocks for controlling the gator:environment (see Figure 3). The main thing to remember is to connect the ground wire first to prevent any incomplete circuits. Incomplete circuits can cause parts of the system to heat up.
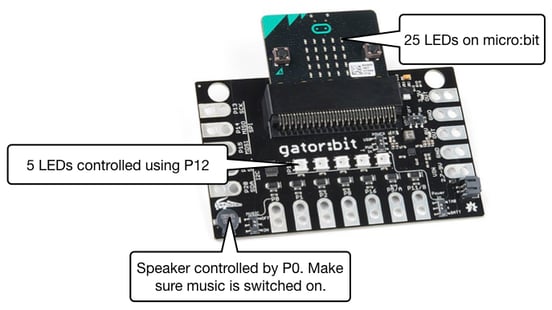
Figure 1: Ways to use the gator:bit/micro:bit to represent information.
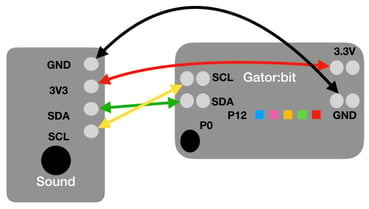
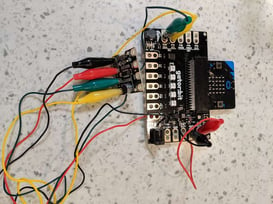
Figure 2: Wiring diagram for the gator:environment sensor and picture of an actual set up.
 |
This block must be run in the on start block to make a little room on the micro:bit for the gator:environment to get the values from the sensor. |
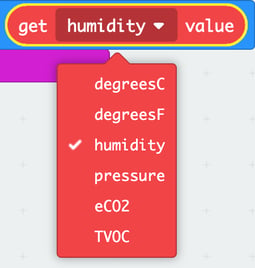 |
The gator:environment can measure six different things: temperature in Fahrenheit and Celsius, Pressure, Humidity, Carbon Dioxide (CO2) and Total Volatile Organic Compounds. To change which value the gator:environment gives you, click the down arrow in the block sensor. |
Figure 3: Control blocks for the gator:environment.
Before the Activity
- Separate all the materials so that each group has all the parts they need.
*I recommend printing out the wiring guidelines in Figure 2.
- Print the environmental sensor activity sheet that guides students through the activity
With the Students
Figure 5: Sequence of moves in MakeCode to add the neopixel library
- Once students have finished the single sensor value controlled light and music show, have them partner with another pair of students and try out each others designs.
- Now students move on to adding addition sensor values. Again have the students plan their design using the activity sheet.
- Students build on the MakeCode project they already created to add more complexity.
- Once students complete their programs, have them test it out. This is a video example of a possible solution. This is the MakeCode project that corresponds to the video example.
- Students conduct design share outs where they explain their design choices. Some suggested strategies for doing this are
- Have pairs partner up and share with each other
- Break the pairs in half and do a gallery walk. Then have the pairs swap.
- Have each group present their lights and music show to the class.
- Finish with a brief whole class discussion on struggles the students had completing the tasks and how they overcame them.
Troubleshooting Tips:
- Coding
- Students tend to struggle with the logic blocks and it can be worthwhile bringing the group together to go over the creation of an if/then/else statement where they compare noise levels.
- Have students build their programs in small pieces and then download and test to avoid having a large debugging process at the end. For example, as students build out their if/then/else statements test each one to make sure it’s behaving as it should.
- gator:environment
- Power is usually not an issue, but sometimes having all the LEDs on at full power can cause the gator:environment to have weird readings. However, this sensor appears less prone to this issue than other gator sensors, at least my experience.
- I recommend turning off the LEDs and pausing a few seconds before each reading is taken.
- The carbon dioxide reading becomes more accurate the longer the system is powered on. It is not unusual for it give a few readings of 0 when first powered on.
- Wiring
- Make sure that students follow the diagrams
- Make sure that students all ALWAYS connecting the ground wire first
- Don’t have students connect the batteries until they have tested the code when the micro:bit is powered using the USB cord.
- It helps to give students wires that match the colors on the diagram or at least red and black alligator clips for power and ground.
- Displays
- Remind students which pins control the sound (P0) and neopixel LEDs (P12) on the gator:bit
- If using the speaker on the gator:bit, make sure that the music switch is on the on position (it’s right by P0).
- The Music has different options such as play in the background or play multiple times which allows other parts of the program to proceed. This can be confusing to the students because different music can start playing on top of each other.
- If students are changing individual neopixels or clearing out the neopixels, they must use the show block to see their changes displayed.
Going Further:
- Students can add more lights to their show using the gator:color board.