Activity Name:
Keep Out! Make an Electronic Safe with Remote Alarm
Grade Level:
6 (Could work for 7 & 8)
Time Required:
Two 45-minute sessions
Expendable Cost/Group:
- Recycled cardboard boxes
- Other materials to make small boxes and decorate them
Group Size:
2 students
Subject Areas:
science, technology
Summary
We can talk to our computers and phones to play music or send messages. Some houses and cars can send us a message if someone tries to break in. To do this, microcontrollers use sensors to gather information about the world around them and then use radio waves to send signals and messages about that information. To create their own high-tech security system, students will program their micro:bit microcontroller to detect an intruder and then send a signal to activate a remote alarm on a gator:bit board.
Keywords
alarm, radio, circuit, Internet of Things, output, input, sensor, light sensor
Educational Standards
ISTE
- Empowered Learner 1c
- Students use technology to seek feedback that informs and improves their practice and to demonstrate their learning in a variety of ways.
- Computational Thinker 5c
- Students break problems into component parts, extract key information, and develop descriptive models to understand complex systems or facilitate problem-solving.
NGSS
- MS-PS4-2
- Develop and use a model to describe that waves are reflected, absorbed, or transmitted through various materials.
- MS-ETS1-4
- Develop a model to generate data for iterative testing and modification of a proposed object, tool, or process such that an optimal design can be achieved.
Prerequisite Knowledge
Students should have a basic knowledge of programming the micro:bit and using a conditional block, completing activities such as the “Nametag” and “Rock, Paper, Scissors” at makecode.microbit.org. If they have not already used radio commands in previous projects, they will need instruction on where to find the radio commands in the programming environment.
Learning Objectives
After this activity, students should be able to:
- Identify the difference between output and input when using a micro:bit.
- Program a micro:bit to collect and use analog input (light level) in a conditional statement.
- Program a micro:bit to use a radio signal to activate a remote device.
Materials List:
- Each group needs:
- 2 micro:bit boards
- 1 download cable
- computer or netbook with access to makecode.microbit.org
- gator:bit board
- 2 1.5V battery holders with micro:bit connector
- small cardboard box or other recycled container
- markers, colored paper, stickers, beads, pipe cleaners, plastic bottle caps, or other materials for students to use to decorate their “safes”
Introduction / Motivation
You may have seen all sorts of ways people protect their treasures in movies - motion sensors, pressure sensors, lasers, and lots of alarms and traps. Here’s a famous one: Indiana Jones idol swap scene.
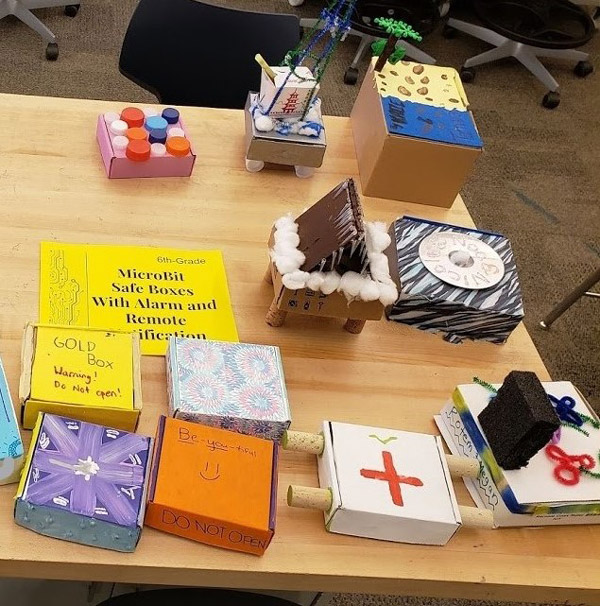
In the past, you may have needed traps, heavy iron doors, and guards to protect your treasure, but today, we can use digital electronics to design a system that will instantly let us know if someone is out to steal our stuff, even if we’re nowhere near our treasure vault. We’re going to build our own safes that use the light-detecting capability of the micro:bit to sense if someone has broken into our vault. And we’re going to program another micro:bit to sound a remote-controlled alarm that we can carry with us. (Teacher demonstrates opening the safe-box and having the musical alarm go off.)
For our project, we’ll be using the micro:bit as both a light sensor AND a radio, and we’ll use the speaker on the gator:bit board for our alarm sound. Light is sensed by the micro:bit by using the LED array. How this actually works is pretty complicated, but you can just think of the light sensor as being located in the LED array. You’ll begin by testing all of these components: the light sensor, the radio, and the speaker. Then you’ll put it all together to create a program that will sound an alarm if someone breaks into your safe.
Day One
Background
By completing introductory activities on the Equipment Testing worksheet, students will learn the basics of using the micro:bit light sensor and radio as well as the speaker on the gator:bit board. After students have gathered light-sensor data and sent messages to each other, they’re ready to put it all together by programming an alarm system. Working in teams of two, students will design and construct a unique safe-box to house their micro:bit light detector. Then they’ll test their system to see if opening the safe-box causes the second micro:bit to trigger an audible alarm using the gator:bit board’s speaker.
Students then read about real-world alarm systems and reflect on how their own micro:bit alarm system uses the same technology as the real-world alarms.
Before the Activity
- Copy “Equipment Testing” worksheet (one copy per team of two) and “Reading: How Burglar Alarms Work” worksheet (one copy per student). Prepare an offline version of the reading if students will be unable to access it online.
- Have a copy of the Teacher's Resource worksheet handy for yourself
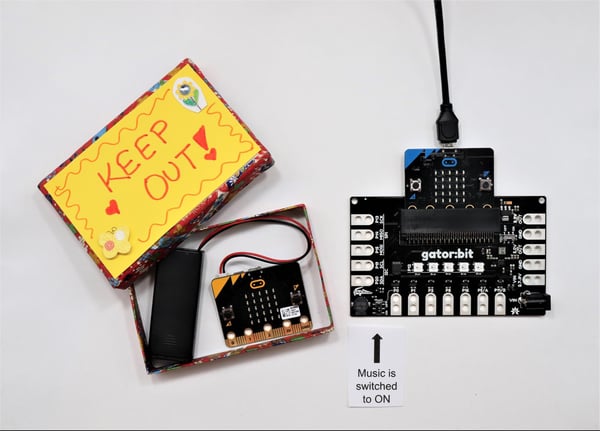
- Build and program a sample micro:bit set-up to demonstrate a light-triggered alarm. One micro:bit will need to be in a box and connected to a battery pack. The other micro:bit will be inserted in the gator:bit board and can be connected to a battery or USB for power. Be sure the small slider switch next to the speaker on the gator:bit board is switched ON.
- micro:bit safe-box alarm sample program for demonstration
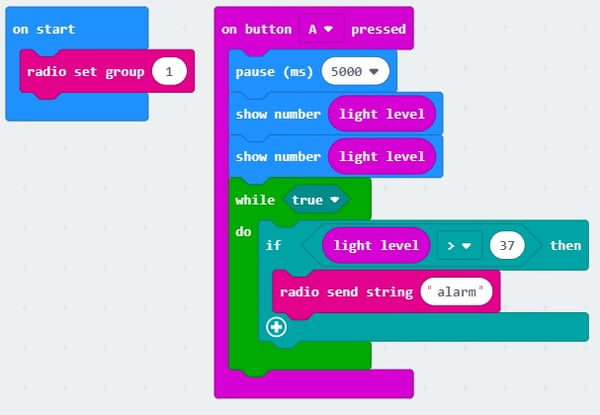
Sender Program (in box) You will need to set the light level for your own micro:bit.
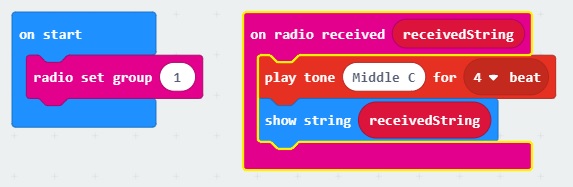
Receiver Program (attached to gator:bit board)
- Organize the following items in a box or tub for each group of two:
- 2 micro:bits
- 1 micro:bit download cable
- 2 battery packs for micro:bits
- 1 gator:bit board
- Organize an area with cardboard, recycled containers, colored paper, plastic bottle caps, sequins, pipe cleaners, stickers, markers, scissors, and glue or other supplies for students to use to construct their safe-boxes. Don’t let students use these materials until they have finished the programming for their alarm system. Students can get sidetracked on building!
With the Students:
- Divide the class into groups of two.
- Present the Introduction/Motivation information and demonstration.
- Pass out Equipment Testing worksheet (one worksheet per group of two students).
- Students perform the light sensor, radio, and sound tests on their equipment using the Equipment Testing worksheet. This worksheet will familiarize students with the code blocks they will need to write a complete alarm program.
- When they have successfully completed testing their equipment, student pairs should work together to write their alarm program using the pseudo-code guidelines on page three of Worksheet 1. Their complete alarm program should do the following:
“Sender” micro:bit (in the safe box)
- On button A press:
-
-
- pause 5 seconds (to allow time to close box lid)
- show the light level on the display
- show the light level on the display again
- start a loop (“while TRUE”)
- if light value > X
- then send message to microbit B
- end the loop
“Receiver” micro:bit (in the gator:bit)
Additional options for advanced students: Scroll message, flash lights, send message to receiver to turn off alarm on button press B.
- Before releasing students to build their safe-boxes, check to make sure the Equipment Testing worksheet is complete and groups can successfully demonstrate their program.
- Equipment testing, box building, and alarm system testing will continue during the second day.
Day Two
Before the Activity
- Organize the following items in a box or tub for each group of two:
- 2 micro:bits
- 1 micro:bit download cable
- 2 battery packs for micro:bits
- 1 gator:bit board
- Organize an area with cardboard, recycled containers, colored paper, plastic bottle caps, sequins, pipe cleaners, stickers, markers, scissors, and glue or other supplies for students to use to construct their safe-boxes. Don’t let students use these materials until they have finished the programming for their alarm system.
- Have copies of Reading: How Burglar Alarms Work on hand (one for each student).
- Copy Worksheet 2 - reading and analysis worksheet
With the Students:
- Discuss the difference between input and output. Input devices gather information for a micro:bit or computer. For example, the keyboard and mouse are input devices for a computer. The micro:bit has switches (like the A and B buttons), an accelerometer, a compass, and ways to measure temperature or light. These are all inputs. The radio signal that a micro:bit can send is an output. A speaker or light are other examples of output devices that can be used in a micro:bit program. Ask the students what the input and outputs are for their alarm program (Answer: light reading = input; radio signal and speaker = outputs).
- Continue building and testing safe-box alarm systems.
- Early-finishers can begin reading and analysis worksheet. The reading and worksheet can be assigned for independent homework or additional time may be given in class to work on it.
- Closure: Discuss how students can improve their alarm systems. How could they add flashing lights or a scrolling message? Can they think of a way to control the micro:bit in the box with the remote micro:bit in the gator:bit board (for example: reset the alarm or stop the program)?
Troubleshooting Tips
The first (and sometimes second) light readings displayed by a micro:bit can be false readings. Often, upon start-up, the light level will read as 255 (the maximum number possible). To avoid using false readings, the student worksheet guides students to display but discard the first two readings and only use later data.
- If an alarm system goes off even before the box is opened, check to make sure the program contains two light level readings that are not actually used in the conditional statement. For example:
- If the micro:bit radio isn’t working, make sure the “radio set group” number is the same in both micro:bits.
- If no sound is coming out of the gator:bit speaker, make sure the little slider switch next to the speaker (labeled “Music”) is switched to ON.
Going Further
- This lesson doesn’t go into details about how the light sensor on a micro:bit works. It can be confusing to students, since it’s not simply a photoresistor. For students who are ready to explore the light-sensing capability of the micro:bit further, they can watch this video that explains exactly how the micro:bit uses LED capacitance to produce a light-level.
- Students can also learn about how the micro:bit radio works in-depth in this video.


