Activity Name:
Code aMAZEing to the Rescue
Grade Level:
Grade 8 (Could work for grades 7 to 11)
Time Required:
110 minutes
Prerequisite:
Each student needs to be familiar with the basics of drive forward & turning. It may be helpful to review experiments two and three in the SparkFun Inventor's Kit for RedBot Experiment Guide with students prior to introducing this lesson.
Expendable Cost:
- Masking or blue/green removable tape
Group Size:
2-3 students. (One robot and one computer per group)
Subject area:
algebra, computer science, geometry, measurement, physical science, physics, problem-solving, reasoning & proof, science & technology
Summary:
In this lesson, using code from previous experiments (drive forward and turning), students will use the code to develop a sequence of coded movements to have their robots autonomously move through a maze (or pathway). Students will also use measurements and conversions of units of time into distance traveled to create the coded pathway. The whole lesson theme is developing a route to bring a safety line to trapped people in a building through an autonomous moving robot .
Keywords:
code, vectors, drive forward, turning, maze, pathways, problem-solving, robotics
Educational Standards:
NGSS
- HS-ETS1-4
- Use a computer simulation to model the impact of proposed solutions to a complex real-world problem with numerous criteria and constraints on interactions within and between systems relevant to the problem.
Learning Objectives:
- Use the code(s) (Drive Forward/Turning). Students will use these code(s) to develop a sequence of coded movements to have their robots autonomously move through a maze (or pathway).
- Students will use a scale model, take measurements, and convert to real or larger scale
- Students will also convert units of time into distance traveled
- Students will use a sale model, and measure the degree of turn
- Students will use the mathematical measurements, convert to codes, and develop a sequence of movements for the robot to follow
- Students will understand how automation works and use algorithmic thinking to develop a sequence of steps to create and test their automated solutions
- To move in a straightforward movement.
- To do a turn movement
- Sequence
- By having the students asking questions and defining problems, it will build experiences which will progress to formulating, refining, and evaluating their design problems using models and simulations.
- Students will also analyze complex real-world problems by the specific criteria and constraints for successful solutions
- Students will be using mathematical and computational thinking skills which will build on their experiences and progresses in their development of the coded sequence.
- Students will be using computational simulations.
Materials List:
- SparkFun Inventor's Kit for RedBot
- Computer with Arduino CC software loaded
- Connector cable
- Meter stick and ruler
- Protractor
- Stop watch/timer
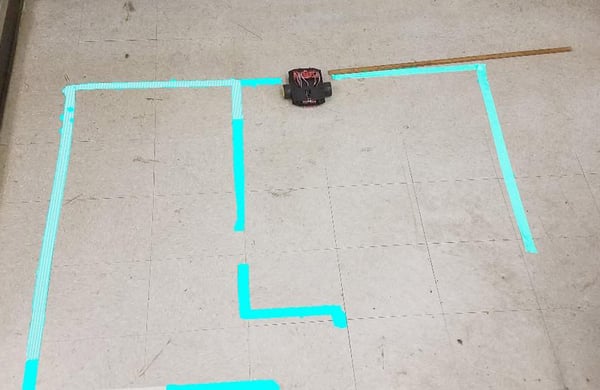
- Pre-set to scale maze/pathway for each group (See Appendix B)
- Paper or tape to outline maze/pathway on the floor
- Print outs of the Appendices for each group - includes Drive Forward code, maze diagrams and tracking chart
Introduction / Motivation:
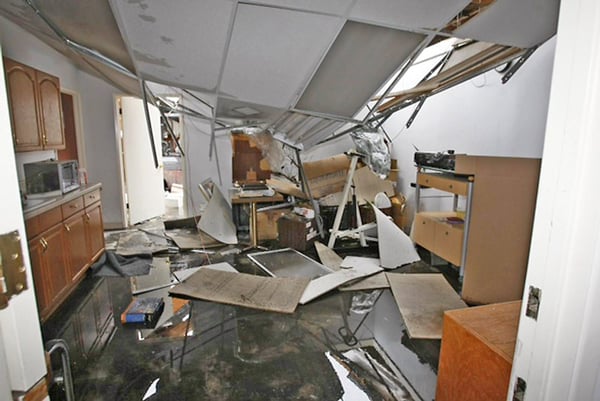
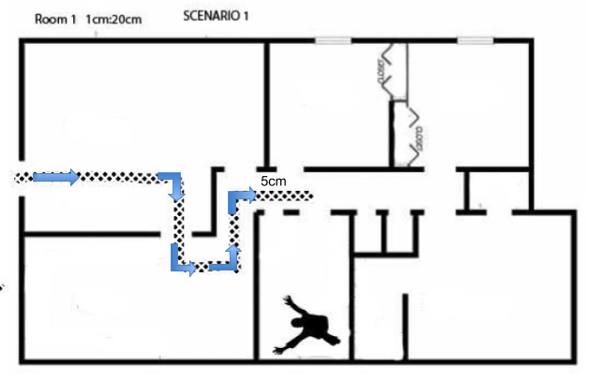
Today we have been tasked with how to send a robot through a damaged building. (show an image of a collapse building- see below for example) There are people trapped at some point within the building. A robot needs to carry a line that will have light and communications in it to the trapped people. Since you can't see, you can’t manually control the robot. You will have to allow the robot to autonomously maneuver to these people. As the Robotic Engineer(s), your team will have to code your robot to the designated area to reach the trapped people. We have been provided the plans for the building. (Show the plans for the building- in Appendix B).
Using the plans, your team will have to measure and record the pathway/route your team plans on traversing. Your team will have to know each distance and the angles to turn. Remember, the plans are a small scale version of the actual building. Your team will have to convert your data to match. You all have learned the basics of coding these robots – So what do you think you can do to get this cable to these people? (Answer- code the robot to maneuver through the hallways – code the robot to follow a very specific path and turns) What information do you need to know to get the robot to autonomously get to these people? (the actual measurements; length of each part of a hallway, the turns, degree of turn, direction of turn, etc)
Here is our building and where the people are trapped. (Place scenario 1 on the interactive whiteboard board- smaller scale) I am giving each group their own floor plan with the scale. Make sure you take accurate measurements and degrees of turns. You will write the code for the robot to autonomously travel to the trapped people. Time is of the essence.
Procedure:
Before the Activity
- Tape a to-scale path to be placed on the floor (you could use paper to outline the pathway or tape)
- Gather materials and make copies of the building plan
- Have image of collapsed building posted
- Question that needs to be addressed someplace: you have coded the robot to drive forward using time – what is the distance of that time?
- Ensure that the students have used and practiced using the Drive Forward and Turning code experiments. See Appendix A
With the Students
- Divide the class into pairs and provide handouts of Appendix C to each group.
- Review background information.
- Each Robotic Engineering Team needs to:
- Run a minimum of 5 trials of the Drive Forward with your robot and measure how far your robot travels in seconds. Record in data chart (Appendix C)
- Calculate the average speed of your robot (in inches per second) using the equation: avgSpeed = distance / time.
- Once you know how far your robot travels in a specific time frame and how to turn corners you can now begin the adventure.
- Review the building plans/map/maze and decide what route you plan to take to get to the trapped people.
- On the plans/map/maze measure out the distances and turn angles you will need. Remember the paper map is one scale and the map on the floor is another scale. See Appendix B.
- On your team’s scale drawing, draw the desired pathway/route.
- Measure the distances and turn angles and turn directions from that scale drawing.
- Record these measurements (data) on the chart in Appendix C.
- Do conversion calculations on the chart.
- Write your code based on your mapped-out route.
- Test the route and revise the code.
- Whole class trials/competition to see how everyone does.
| Route (Steps Command) |
Scale Drawing Measurements |
Measurements Needed for Actual Drawing |
Distance Converted to Time |
Code Language |
| 1. Go forward |
9cm |
180cm |
1.7 sec |
|
| 2. Turn right |
90' |
|
|
|
| 3. Go forward |
5cm |
100cm |
0.4 sec
|
|
| 4. Turn left |
90' |
|
|
|
| 5. Go forward |
3cm |
60cm |
0.5 sec |
|
| 6. Turn left |
90' |
|
|
|
| 7. Go forward |
4cm |
80cm |
0.72 sec |
|
| 8. Turn right |
90' |
|
|
|
| 9. Go forward |
5cm |
100cm |
0.9 sec |
|
* Scale is 1cm to 20cm. Distance traveled in 2 secs = 110cm or 1 sec= 55cm
Troubleshooting Tips:
- My RedBot is not driving straight! It drives in a curve! This is a pretty common thing for the RedBot, and for all robots with independent drive wheels. There are lots of reasons for it, but it's something that simply must be dealt with.
- First, check to make sure that there is nothing rubbing on either of the wheels or on the magnetic motor encoder. Move the wheels out so that they are not rubbing, but still tightly seated into the motor. Any added friction on one side will cause one side to drive faster than the other (resulting in the RedBot pulling to one side.)
- Second, driving straight requires equal power on both wheels. This requires equal amounts of traction on both wheels. Running the motors up at full power sometimes causes the wheels to "spin out" and lose traction. Try reducing the motor power to something lower than 255.
- Third, use an encoder to ensure that both wheels turn the same distance each time. "What's an encoder?" check Experiment 7.
- If your RedBot isn't turning 90 degrees, there are two things you can adjust.
- Try changing the turning time by changing the delay(500); The default example is set for 500 ms.
- You can also try changing the motor power during the pivot. Once you have your RedBot making a nice 90 degree turn.
Going Further:
- Develop more complex building plans (some provided, see Appendix B)
- Chose different areas to get to, this increases distances, number of turns, etc
- More turns and pathways, angles that are not 90 degrees.