Activity Name: Color Magic: Make a Color-Changing Light
Grade Level:
6 (Could work for 7 & 8)
Time Required:
Two 45-minute sessions
Expendable Cost/Group:
- Play-Doh (can be re-used) - $2
Group Size:
- Day 1 = groups of 4
- Day 2 = groups of 2
Subject Areas:
science & technology
Summary:
Light shows can be dramatic and beautiful. But even the most complex color-changing light show has at its heart basic rules about current. Students will use a physical model to experiment with resistance and current to create the colors of the rainbow and then take that knowledge digital as they program a micro:bit microcontroller to create their own mini light show.
Keywords:
light, color, circuit, RGB, LED, current, resistance, diode, conductive dough (Play-Doh)
Educational Standards:
ISTE
- Empowered Learner 1c
- Students understand the fundamental concepts of technology operations, demonstrate the ability to choose, use and troubleshoot current technologies and are able to transfer their knowledge to explore emerging technologies.
- Computational Thinker 5c
- Students break problems into component parts, extract key information, and develop descriptive models to understand complex systems or facilitate problem-solving.
NGSS
- MS-PS4-2
- Develop and use a model to describe that waves are reflected, absorbed, or transmitted through various materials.
- MS-ETS1-4
- Develop a model to generate data for iterative testing and modification of a proposed object, tool, or process such that an optimal design can be achieved.
Prerequisite Knowledge:
Students will need to know that mixing colors of light is different from mixing paint colors. Many students learn in elementary school that the three primary paint (pigment) colors are red, blue, and yellow. Combinations of these pigment colors create the secondary colors purple, green, and orange.
Mixing colors of light is different. The three primary colors of light are red, green, and blue (the RGB of an RGB LED). For light, red + green = yellow, green + blue = cyan, and blue + red = magenta/violet. The difference between pigment color mixing and light color mixing is reviewed on the worksheet for Day 1.
Students should have basic knowledge of programming the micro:bit, such as completing the “Nametag” and “Rock, Paper, Scissors” activities at makecode.microbit.org. If they have not already used pins 0, 1, and 2 in previous projects, they will need instruction on where to find the pin commands in the programming environment.
Learning Objectives:
After this activity, students should be able to:
- Identify the combinations of red-green-blue light that produce the secondary light colors yellow-cyan-magenta.
- Understand that the length of a wire affects resistance, the longer the wire, the more resistance
- Understand that more resistance in a circuit will result in less current flow.
- Change the color of an RGB LED by changing the resistance in the 3 legs of an RGB LED
- Program a micro:bit to create changing colors with an RGB LED.
Materials List:
Each group needs:
- Day 1: Exploration (groups of 4)
- Day 1 worksheet
- gator:starter board
- red, green, and blue conductive dough (Play-Doh, for example)
- 4 alligator clips with pigtails (alligator clip on one end and a pin connector on the other)
- 1 alligator test lead (alligator clips on both ends)
- 6V battery holder
- colored pencils
- blank piece of paper for each student to sketch on
- Day 2: Programming (groups of 2)
- Day 2 worksheet
- gator:starter board
- micro:bit
- 4 alligator test leads (preferably 1 red, 1 green, and 1 blue, and 1 black)
- download cable
- computer or netbook with access to makecode.microbit.org
Day 1
Background
The first day of this activity uses Play-Doh and the gator:starter board to explore how changing the resistance to the legs of an RGB LED changes the color of light it produces. After exploring the basic concepts, students will create a micro:bit program that digitally changes the amount of current supplied to each LED leg in order to change the color of light produced. Remind students that light colors combine differently than paint colors.
Before the Activity
- Copy worksheets.
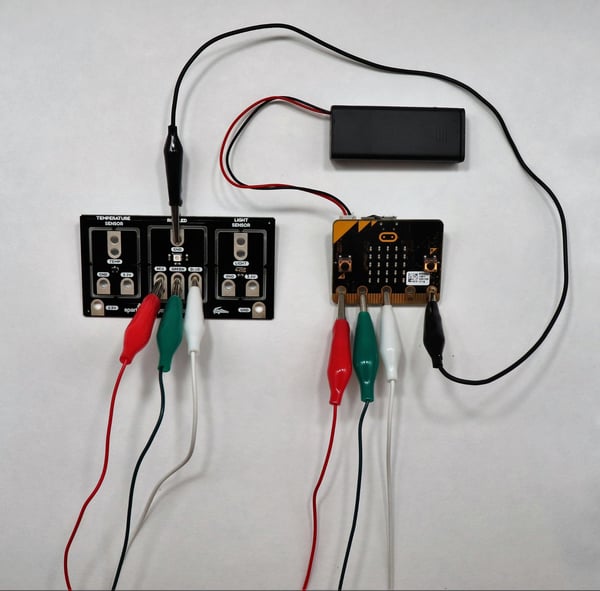
- Build and program a sample micro:bit set-up to demonstrate a color-changing LED during the Introduction. micro:bit with pin 0 connected to RED, pin 1 connected to GREEN, pin 2 connected to BLUE, and micro:bit GND pin connected to the GND connection directly above the LED on the gator:starter board.
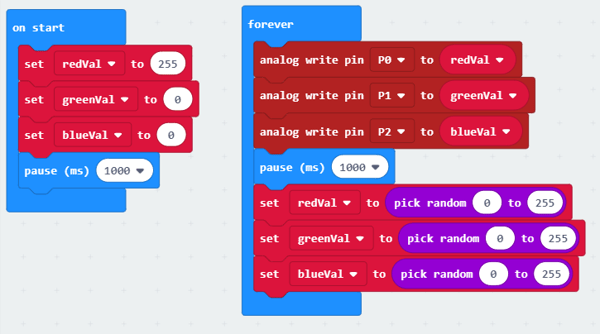
- Color-changing LED demonstration program:
- Organize the following items in a box or tub for each group of four:
- activity worksheet
- red, green, and blue Play-Doh
- 4 alligator clips with pigtails
- 1 alligator test lead
- 6 V battery holder (don’t give the students batteries until they have made their testing set-up)
- gator:starter board
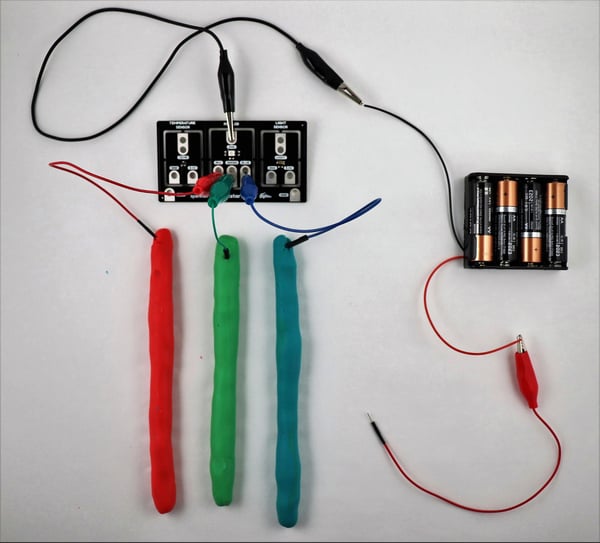
- Have your set-up onscreen or provide students with a picture for reference, such as the one on the worksheet or shown below.
Note: You can use alligator clips with clips at either end for everything, but the pins make it less likely that the students will connect the battery pack directly to the board. The battery should only be connected to the board at GROUND. The positive connection for the battery should only be to the Play-Doh. The battery pack supplies more voltage than a micro:bit will. This is necessary because of the increased resistance of the Play-Doh.
Introduction / Motivation
Have you ever seen lights that change color? Was it in a toy, a string of lights, or maybe at an amusement park? Color-changing lights can be very beautiful and can seem complicated to make. You can use a single LED to make all the colors of the rainbow just by changing how much electrical current flows to it. (Teacher dims the room lights and demonstrates the micro:bit color-changing LED program. A thin piece of white paper in front of the LED will diffuse the color a bit to show the blended color better. This is especially helpful when showing this onscreen using a document camera.)
Now, that’s one LED. You can use lots of LEDs to do some pretty amazing things. (Show this video or this video of an LED lightshow)
It looks like we’d need a computer to make the colors change, but for one LED, we only need some Play-Doh and a battery! Once we figure out how it all works, we can use the micro:bit microcontroller to get a bit more fancy, but it’s easier to figure out what’s happening if we first experiment on a model made of simpler materials.
Color-changing LEDs are called RGB LEDs. RGB stands for red, green, and blue -- the primary colors of light. RGB LEDs have four legs, one for each of these colors, and one for ground. If you only send electricity to the red leg, then the LED lights up red. If you send some electricity to the red leg and some to the green leg, then the LED lights up yellow. Remember, mixing light colors is not the same as mixing paint colors.
You’re going to build a color-changing light using an RGB LED, a battery, and Play-Doh for wires. (Display the basic Play-doh setup with a document camera or by having students gather around a table.) Depending on where we connect these wires to the battery, we can change the resistance of each leg. If the electricity has to travel farther to get to an LED leg, then that color will get less power.
With the Students:
- Divide the class into groups of 4.
- Present the Introduction/Motivation information and demonstration.
- If color-mixing with light is new to the students, discuss the color-mixing portion of activity worksheet as a class.
- Allow time for students to build their lab set-up according to the picture on the worksheet.
- Emphasize that the positive probe connected to the battery should never touch the gator:starter board directly, only the Play-Doh.
- Double-check electrical connections for each group before handing out the batteries.
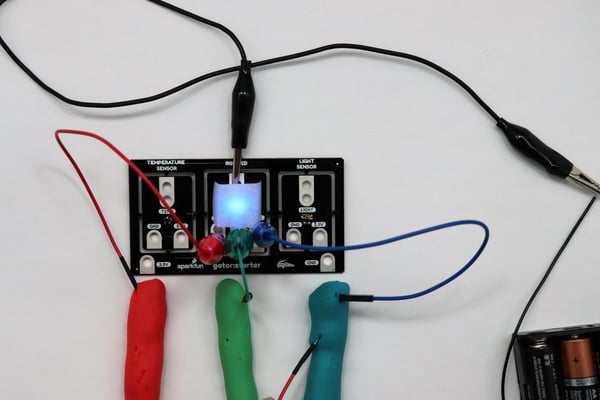
- Guide students through steps 1 and 2 on the worksheet (touching each colored Play-Doh with the positive probe and combining red and green). In this “we-do” phase, make sure students are able to light their LED and that they are able to see the expected colors.
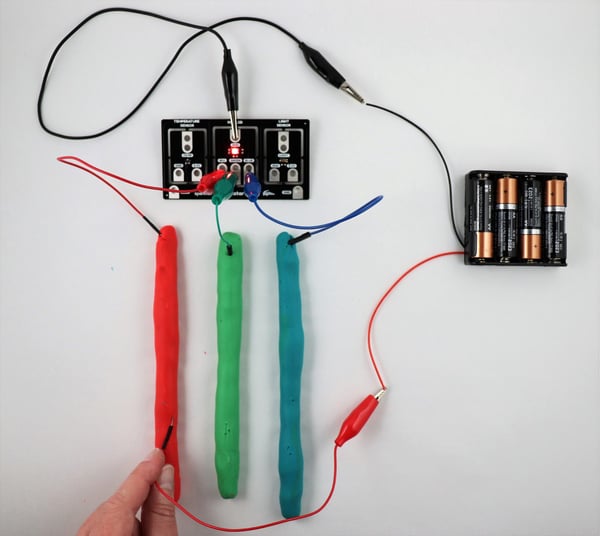
Worksheet step 2: The red and green Play-Doh tubes connected at the bottom: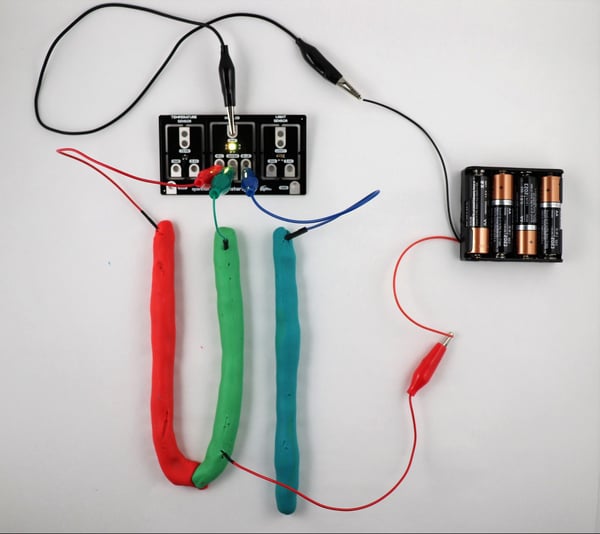
- Discuss the “Important to Know” section after step 2 on the worksheet. Draw the parallel again with a student having less energy left after running a long distance vs. running a short distance.
- Give students time to finish the worksheet and their sketches in groups.
- If time permits when students have finished, call out a color such as “purple”, “orange”, or “teal” and invite students to share their color mixing circuit sketches on the document camera.
- Closure: Tell the students that they’ll be taking it digital in the next class section as they use their findings to program a color-changing LED with the micro:bit.
Day 2
Before the Activity
- Organize the following materials for each group of 2:
- Day 2 worksheet
- micro:bit
- gator:starter board
- 4 alligator test leads
- micro:bit download cable
- computer or netbook with access to makecode.microbit.org
Introduction/Motivation:
We were able to change the color of an RGB LED by changing the resistance in a circuit made with Play-Doh, but we can’t wire up a light display with Play-Doh. We can’t control hundreds of lights by moving our electrical connections around, but we can change the color of our LED by turning the amount of electricity supplied to an LED pin into a number. We can program it using a microcontroller.
Today, we are going to program a micro:bit microcontroller to change our LED’s color. This is the same type of technology and programming that is behind beautiful art installations like this one.
You’ll experiment in groups of two to discover the settings for different colors and then program a short light show.
With the Students:
- Divide the class into groups of 2.
- Demonstrate your color-changing micro:bit program again that you showed the students at the beginning of Day 1.
- As a class, read the opening paragraph on the Day 2 worksheet and guide students to complete the primary color value chart at the top of the worksheet.
- Preview the rest of the worksheet, using your own demonstration micro:bit as an example onscreen if possible.
- Invite students to predict what the values of yellow will be (first row, second chart). Let students share their predictions and note them on the board. You can determine who made the most accurate prediction later, if desired. (Values should be between 1-255 for red and for green, and 0 for blue. Students may think that the red and green values need to add up to 255, which is not the case.)
- Give students time to finish the worksheet and program their light show. The project can be extended for an additional day to include more complex programming, use of buttons, or music.
- A frosted plastic cup or translucent paper can be placed over the LED to diffuse the light.
Troubleshooting Tips
- Day 1 ONLY
- The high resistance of the Play-Doh necessitates using more than 3V for the power supply. DO NOT connect the 6V positive side directly to the gator:starter board. ONLY connect the ground wire to the gator:starter board.
- If you use 3V with the Play-Doh, the LED will not receive enough current to produce enough green or blue light for color mixing.
- Both Days -- Color blindness/color vision deficiency
- There are many types of color vision deficiency. Some students may not even be aware that they have different color vision. Encourage groups to describe the colors they make to each other and explain that not everyone will agree.
- Increasing visibility of LED colors
- A piece of waxed paper or white kitchen parchment paper makes a good diffuser to place over the LED so that the color may be seen more clearly. The “light shows” may also be more visible if the sequence is recorded as a video on a camera or phone.
Going Further
- Making electricity take a longer path is only one way to increase resistance in a circuit. A more common way is to add a component called a resistor. You can learn more about how resistors work with this SparkFun video.
- The light show project can be extended to include sensors, multiple micro:bits, and syncing with music.


