Activity:
Pull-the-Plug: micro:bot Robotic Competition Challenge
Grade Level:
6 (Could work for 7 & 8 too)
Time Required:
Three 45-minute sessions
Expendable Cost/Group:
- Approx. $1.00 per group for straws, pipe cleaners, tape, etc. for robot arm construction
- One-time field construction cost: $15
Group Size:
2-3 students
Subject Areas:
science, technology
Summary
Robot battles with flame-throwers and buzz saws may be exciting to watch, but it’s just as exciting to face off against other robotics teams with something a little less destructive if you design the robot yourself. In this challenge, students will design, build, and program a robot which will compete against other teams to retrieve the most targets from the playing field. To succeed, they’ll need to learn about motor-speed matching, the physics of robot arms, and game strategy.
Keywords
robot, autonomous, criteria, constraint, robotic arm, lever, simple machines, servo, motor, motor-matching, speed, accuracy, iterative testing, competition
Educational Standards
ISTE
- Empowered Learner 1c
- Students articulate and set personal learning goals, develop strategies leveraging technology to achieve them and reflect on the learning process itself to improve learning outcomes.
- Computational Thinker 5c
- Students break problems into component parts, extract key information, and develop descriptive models to understand complex systems or facilitate problem-solving.
NGSS
- MS-ETS1-1
- Define the criteria and constraints of a design problem with sufficient precision to ensure a successful solution, taking into account relevant scientific principles and potential impacts on people and the natural environment that may limit possible solutions.
- MS-ETS1-4
- Develop a model to generate data for iterative testing and modification of a proposed object, tool, or process such that an optimal design can be achieved.
Prerequisite Knowledge
The teacher should be familiar with the SparkFun micro:bot. Students should have a basic knowledge of programming the micro:bit and downloading programs, such as having completed the “Nametag” and “Rock, Paper, Scissors” activities at makecode.microbit.org. If they have not already used pins 0, 1, and 2 in previous projects, they will need instruction on where to find the pin commands in the programming environment.
If students do not have previous experience programming a servo, the teacher should provide them with the servo code provided in the successful example code. They will still need to adjust the values to fit their robot design. If a more in-depth understanding of servo use is needed, read through the SparkFun micro:bot servo tutorial.
Learning Objectives
After this activity, students should be able to:
- Identify the basic parts of a robot (controller, power supply, movement, manipulators, sensors)
- Explain how relative motor speed affects how straight a robot moves
- Explain how both their robot arm and their own forearm function as third-class levers
- Identify criteria and constraints in an engineering challenge
- Use iterative testing to improve a design
- Program a micro:bot to perform basic autonomous tasks
Materials List
Playing field:
- pine grade stakes (2): $1.00/ea
- recycled corks (8): no cost
- pipe cleaners (8): $2.50/pack of 40
- PVC end caps (8): $0.75/ea
- screws (8): $5.00/pack of 100
Materials for robot arm construction, may include:
- drinking straws
- coffee stirrers
- pipe cleaners
- small cable ties
- index cards
- construction paper
- cardboard
- masking tape
- electrical tape
- transparent tape
- scissors
Each group needs:
Introduction / Motivation
A lot of people think of Battle Bots or Robot Wars when they think about robot competitions. They’re certainly exciting (show this short video of a VERY quick Battle Bot round) Think about how these robots know what to do. Are they controlled by programming or some other way? (Take time to let multiple students try to explain. Answer: They are controlled by remote control, much like an RC car.)
Some robotics competitions are autonomous. This means that the robot must complete the tasks without ANYONE controlling it. The robot can only rely on its programming to help it navigate and do things. There may not be any flamethrowers or spinning blades, but this type of competition can actually be a lot more challenging. (Teacher shows this video from the beginning to the 1:37 mark.)
Those college students had six months to get ready for their robotics competition. You will have two days.
Our challenge for the next couple of days will be an autonomous robotics competition. Your team’s robot will be going head-to-head with other team's robots to see who has the fastest, most accurate, and most strategic robot. Each team will start with exactly the same base robot and the same basic program. It’s up to your team to design and build a robot arm and customize your code to make your robot the best.
Day 1
Background
On the first day, students will learn about the basic parts of a robot, identify criteria and constraints for the engineering challenge, learn the rules of the robot game, and identify some of the key challenges they’ll have to overcome to make their robot successful. They will also begin to design and build their robot arm.
Before the Activity
- Build the playing field elements
- Use this robot testing video for reference. You can make the playing field from different materials, but the pegs must be lightweight. The servos can’t lift a heavy weight, and the pegs should be light enough that a servo could lift more than one with a well-designed arm.
- The playing field in the video example is made from two pine grade stakes placed end-to-end. The pegs sit in PVC end caps that have a hole drilled through the bottom and have been screwed on to the wood. Be sure to tape the stakes to the floor securely. The robots will bump them during testing.


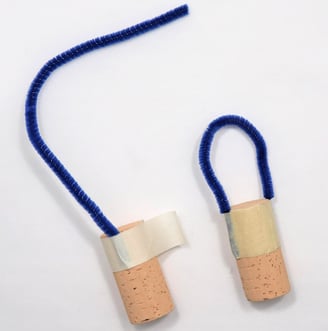
- The pegs are made from corks with pipe cleaners attached with masking tape.
- Baselines can be marked with tape. Place the baseline at a distance that seems right for the skill level of your students. The farther the baseline is from the targets, the more chance the robot has to deviate from a straight line.
- Assemble, program, and test one demonstration micro:bot using the starter code found in the "With the Students". Adjust the code as needed to successfully demonstrate the robot moving forward and backward. Don’t demonstrate an arm, just the basic driving base.
- Be ready to show the videos of students testing their robots. IMPORTANT NOTE: These students are testing their designs. During competition, there is only one robot on each side and the robots must start completely behind the baseline:
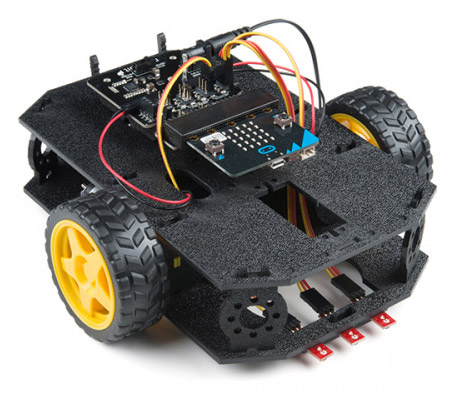
- Assemble micro:bot kits ahead of time. Students will be customizing these with robot arms, but the basic robot should already be assembled. Note: the line-following sensors are not used in this challenge. For more information on the micro:bot and assembly, see this guide
- Copy worksheet and rules sheet, and be sure to have the teacher guide on hand
- Organize the following items in a box or tub for each team of 2-3 students:
- micro:bit robot (assembled) The line-follower attachment is not needed for this challenge.
- 1 micro:bit
- 1.5V battery holder with micro:bit battery connector
- 1 download cable
- computer or netbook with access to makecode.microbit.org
- 1 servo with horn attachments
- Organize a materials station in the classroom so that students can have access to materials to build their robot arm. Materials may include:
- drinking straws
- coffee stirrers
- pipe cleaners
- small cable ties
- index cards
- construction paper
- cardboard
- masking tape
- electrical tape
- transparent tape
- scissors
With the Students:
- Divide the class into groups of 2 or 3.
- Present the Introduction/Motivation information and demonstration.
- Introduce the students to the playing field.
- Pass out the rules, one copy to each team.
- Show the students one or both videos of other students testing their robots. Emphasize to the students that these videos showing testing, not the competition itself. During each round of the actual competition, teams will need to follow the rules. These practice videos do not show competition rounds. https://youtu.be/gpIF4qW_zCQ and https://youtu.be/KtNFRmykmac
- As a class, read the information on the worksheet, “Movement and Manipulators”.
- Allow students time to fill in the table of criteria and constraints.
- Have each team share one of their criteria or constraints until all the teams have a good grasp of these.
- Watch one or both of the practice videos again. Ask students to identify problems that some of the robots are having. (examples: robot does not go straight, arm is not at proper level, arm throws the peg instead of simply lifting it).
- Explain that all teams are starting with the same basic robot and program. It will be up to the teams to design and build the arm, test their robot several times, and adjust their code to fix problems with their robot. Provide the starter code either onscreen or as a downloadable file.
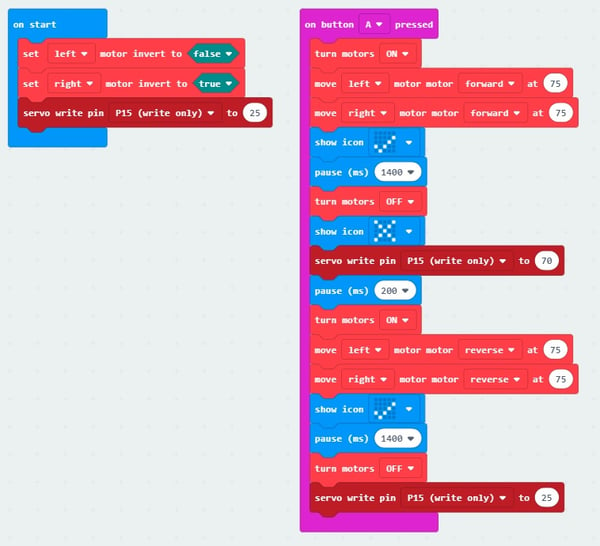
- If students have not worked with servos before, explain that servos are not like the motors that turn the robot wheels. The robot wheel motors turn continuously. The robot arm servo does not turn in a full circle. Instead, it can be precisely moved from one position to another. The number in the “servo write pin” line of code tells the servo which position to move to. If teams try to move their servos too far, they can stop turning (see troubleshooting). For more information on servos, see the SparkFun servo tutorial.
- WARNING: Students should never try to turn a servo by hand. This can damage the delicate gears inside the servo.
- Distribute the robots and starter code to the teams. Before they begin designing their arm, they should make sure their robot can run the default code and move forward and back. Students will need to install the moto:bit extension in their make:code window (Click here for instructions)
Day 2
Before the Activity
Create a round-robin competition bracket and post it in the classroom. Day 2 is for testing and Day 3 for the competition, but seeing the bracket on Day 2 will motivate the teams. You can create the bracket online using a website such as this one.
With the Students:
- Ask students to share successes and problems they have had so far designing their robot arm and adjusting their code.
- Ask each team to report briefly what their team will be doing today to fix, improve, or innovate with their robot design.
- Students will continue testing their driving and recording the motor settings on the “Movement and Manipulators” worksheet, as well as building and testing their robot arms.
- By the end of the class period, students should be ready to begin competition on the following day. Remind students that they may continue to improve their robots between competition rounds. This is a very important part of real-life robotics competitions and teams can dramatically change the success of their robot with changes they make between rounds.
Day 3
Before the Activity
Post the round-robin competition bracket on the board or displayed on screen so that scores may be entered as the competition progresses.
With the Students:
- Give students a short time to prepare their work area (their pit) and get their robot ready for competition. Remind them that they may continue to improve their robot between rounds.
- Run the competition, following the “Pull-the-Plug” competition rules sheet handout.
- Optional: Use the results to create a follow-up competition with an upper bracket (top half of the teams) and a lower bracket (bottom half of the teams). The winner of the lower bracket has the chance to face off against the winner of the upper bracket. Sometimes by this time, the teams have made enough changes on their robots that the lower-bracket winner can beat the upper-bracket winner. This option keeps all the teams involved and demonstrates the power of constant improvement and iterative testing. You will need more time to use this option, though.
Troubleshooting Tips
- Wheels are turning the wrong way:
- There can be several reasons for this. The motors may be connected to the board incorrectly, the “motor invert” command in the code may be incorrect, or the motor might even have had the wiring switched during manufacturing.
- The problem can be solved easily by either changing the “true” or “false” setting for a motor in the “motor invert” command in the program or by switching the physical wire connections for the motor on the micro:bot board.
- Servo does not move/makes a clicking noise
- This usually means that the servo has been driven past the limit of its movement range and the gears are binding. The program will need to be adjusted to a number that is not so close to either end of the movement range.
Going Further
- Explore the connection between human anatomy and levers. The three classes of levers and their equivalents in the human body are summarized in this video.
- Learn more about servos by reading the SparkFun hobby servo tutorial.


