Activity Name:
Illustrating Life Cycles with the micro:bit
Grade Level:
It is targeted for grade 7, but could work for grades 5 to 8.
Time Required:
300 minutes (5 class periods of 60 minutes each)
Expendable Cost:
Crafting materials - paper, glue, tape
Group Size:
2
Subject area:
Life Science
Summary:
Using the SparkFun Inventor’s Kit for micro:bit, students create a model of a plant or animal that demonstrates, through interactive electronic elements, how environmental or genetic factors can influence the growth of the organism. Students collect evidence to inform how their interactive elements will work.
Keywords:
Life cycle, micro:bit, biology, STEM, genetics, environmental science
Educational Standards:
ISTE
- Knowledge Creator
- 3a - Students plan and employ effective research strategies to locate information and other resources for their intellectual or creative pursuits.
- 3c - Students curate information from digital resources using a variety of tools and methods to create collections of artifacts that demonstrate meaningful connections or conclusions.
- Creative Communicator
- 6c - Students communicate complex ideas clearly and effectively by creating or using a variety of digital objects such as visualizations, models or simulations.
NGSS
- MS-LS1-5 From Molecules to Organisms: Structures and Processes - Construct a scientific explanation based on evidence for how environmental and genetic factors influence the growth of organisms.
Prerequisite Knowledge: [(optional) What do students need to know to be successful in this activity]
- Understand how to assemble a basic circuit. A great place to start is the SparkFun Inventor’s Kit for micro:bit Experiment Guide.
- Be familiar with the capabilities of the micro:bit and feel comfortable creating basic programs in the MakeCode environment. Try having students visit the micro:bit MakeCode page and completing a few of the tutorials ahead of time to build experience and confidence.
Learning Objectives:
Students will be able to...
- Explain and visualize how environmental or genetic factors can influence the growth of the organism.
- Demonstrate connection to their program and what happens in their program
- Explain how other environmental changes and/or additions may change the code or wiring or their project
- Define the inputs and outputs of their physical project and connect them to environmental inputs and outputs
Materials List:
- SparkFun Inventor’s Kit for micro:bit
- Crafting materials:
- Cardboard, paper, paper cups, etc.
- Hot glue, hot glue guns, glue sticks, etc.
- Markers, crayons, etc.
- Popsicle sticks, pipe cleaners, etc.
- Googly eyes, stickers, etc.
- Any other craft materials on hand
Introduction / Motivation:
Depending on your students experience level with programming and use of the micro:bit you may want to spend a class period or two exploring the micro:bit and MakeCode in an “Hour of Code” format. It is highly recommended to do this in a series of steps leading up to the project.
Today we’re going to explore how environmental factors affect the life cycle of a plant or animal. There are many things in a plant or animal’s environment that can affect it’s life, so for this project, I just want you to identify and focus on 2-3 factors that you can demonstrate.
Once you have selected your plant or animal, you will do research into what environmental changes (positive or negative) impact its life cycle..
To get you started, here is an example I created:
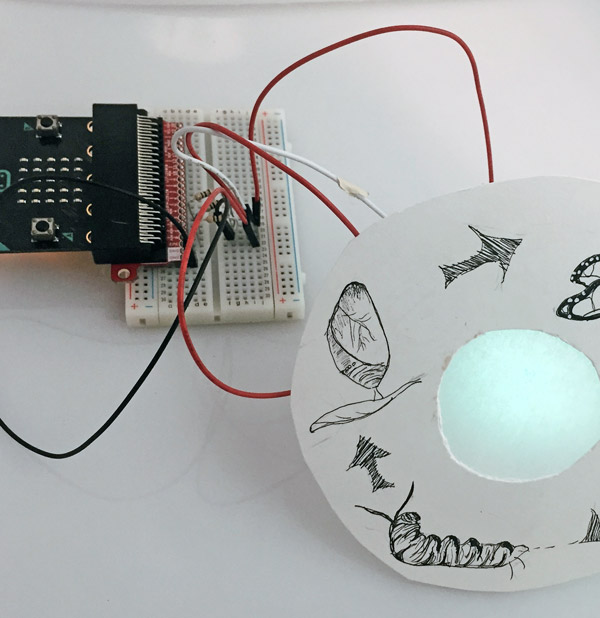
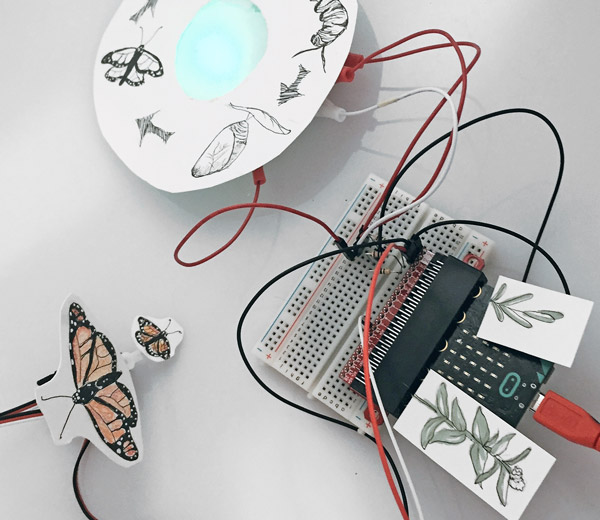
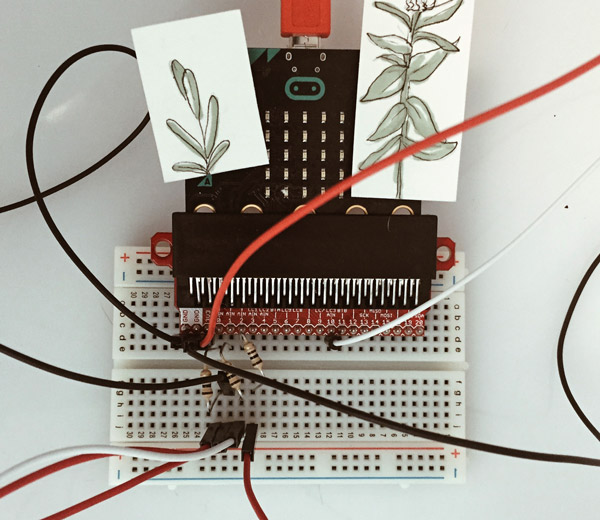
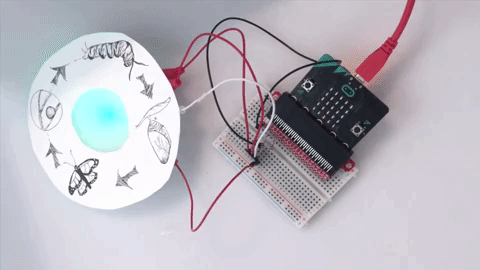
I focused on the life cycle of the monarch butterfly for this example. There are many environmental factors that can influence the life cycle of the monarch butterfly. In my example, I show how the maturity of the milkweed plant that monarch caterpillars eat influences the size of the adult monarch butterfly by pressing images of young and mature milkweed that I’ve added to the buttons on the micro:bit. When the young milkweed is pressed, a servo motor with images of a large and small butterfly rotates. The smaller butterfly should be on top because monarch larvae that eat younger milkweed plants are often smaller than larvae that eat more mature milkweed plants. When the mature milkweed button is pressed, the larger butterfly rotates to the top.
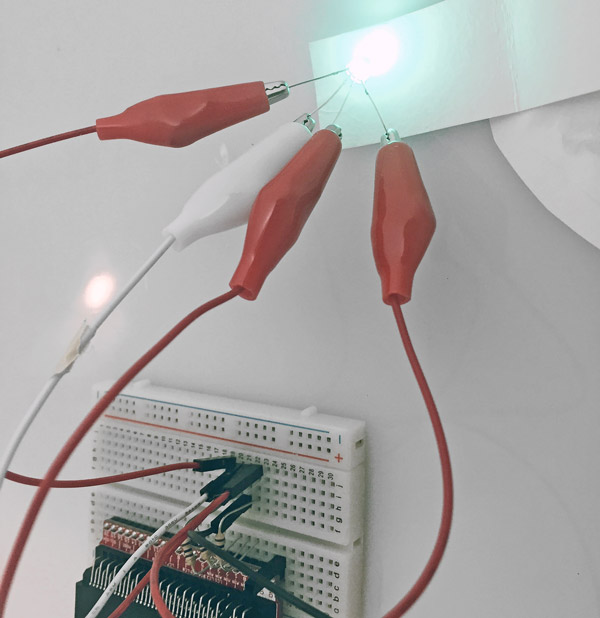
I show how temperature influences the development of the monarch butterfly by using the temperature sensor on the micro:bit to change the color of a tricolor LED. When the temperature is in a good range the light is green, if it’s too hot for the monarch butterfly to complete its life cycle the light turns red, if it’s too cold the light turns blue.
In this video I’m using touch to warm up the micro:bit in order to get it to change colors.
Procedure:
Before the Activity
- Come up with a timeline that’s appropriate for your classroom. This is a flexible project that could be completed over the course of a couple full class periods or could be broken up into smaller parts and completed in a few weeks.
- Divide class into groups of 2 students.
- Student roles can be broken into a mechanical engineer or “builder” and a software engineer or “programmer”
- Decide if you will assign plants/animals to groups or if they will be allowed to choose their own topic.
- Depending on the grade of your class and how much experience your students have with programming the micro:bit, plan some time for the to get acquainted with you through tutorials on SparkFun’s website and/or the MakeCode tutorial system.
With the Students
Step 1
Prompt students to pick an organism to research and find relevant and applicable information on how genetics or environmental factors affect the growth of the organism.
- My example: My organism is the monarch butterfly. There are many environmental factors that can affect their growth such as temperature and the maturity of the milkweed plant, the monarch caterpillar’s only food. Monarch larvae do not grow and develop if the temperature is less than 10° Celsius (50° Fahrenheit) or more than 34° Celsius (93° Fahrenheit). Monarch caterpillars that eat younger milkweed plants can grow to be smaller than monarch caterpillars that eat older milkweed plants.
- Tip: Students should have a minimum of two impacts and probably no more than 4 depending on the student team.
Step 2
Have students brainstorm creative ways to communicate the information learned about the growth and development of an organism.
- Question prompts for students: What are some different ways you could use the LED array on the micro:bit to communicate an environmental impact? Ex: bar graph or show an icon. How could you use different colored LED lights to represent different data? Ex: red lights could indicate a warm temperature, blue lights could indicate a cold temperature.
Step 3
Ask students to create a plan for their model in the form of a sketch as well as a program flow chart.
- Question prompts for students: What are some different ways you could use the LED array on the micro:bit? Ex: bar graph or show an icon. How could you use different colored LED lights to represent different data? Ex: red lights could indicate a hot temperature, blue lights could indicate a cold temperature.
- Tip: have students write pseudocode using plain language before moving on to coding. Ex: “When I press the A button, the motor will turn 180°”.
Step 4
Give students time to assemble the project.
- Tips: Start with assembling the electronic components and making sure the program works as planned. After students are sure that these work, move on to combining the electronic components with the crafted components like paper cut-outs or illustrations. Encourage students to think about the design of their model: how can they change design elements to make their model look better or communicate their concept in a better way?
- Tip: have students write pseudocode using plain language before moving on to programming. Ex: “When I press the A button, the motor will turn 180°”.
My project: I approached this part of my project by breaking it into chunks. First I create a circuit that connects a servo motor to the micro:bit. Then I create my code that tells the servo to move when the A or B buttons on the micro:bit are pressed. See the code example below and feel free to use this and tweak it in your own projects.
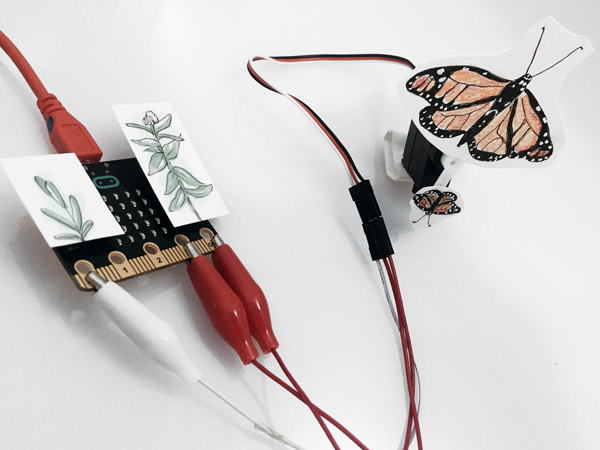
- Note: I started simple by just using the micro:bit and alligator clips with pigtails. I haven’t used the breadboard yet. This is a great way to build students confidence in creating circuits before moving onto creating circuits using the breadboard.
Next, I create a circuit that connects an RGB LED to the micro:bit. Then I create my code that tells the LED to be green if the temperature is between 10° and 34° Celsius, red if the temperature is above 34° Celsius, and blue is the temperature is below 10° Celsius.
- Note: I added a way to show the temperature on the micro:bit screen to this example code by pressing the A + B buttons. This is great for testing to see if your temperature sensor and code are working correctly.
Finally, I’m going to combine both of these circuits and arrange the elements so that I can interact with both of them at the same time.
Encourage students to think about how they can combine the elements of their projects into a final product in which the electronic components that aren’t important for interacting with their project are hidden.
Step 5
Consider having students share their final project with peers, gather feedback, and iterate!
Arrange a gallery walk so that students can interact with and learn from other student’s projects. Encourage students to reflect on the projects and to give each other constructive feedback. Challenge students to incorporate one suggestion from their feedback into their models.
Troubleshooting Tips:
Servo doesn’t work correctly…
The servo is slightly under-powered when used with the micro:bit. Try attaching your battery pack to the micro:bit, but the best way to use the servo is to use it with the Gator:bit
Program doesn’t work as planned…
Make sure that you have your most current program downloaded to your micro:bit
Nothing works!
You may have a short circuit somewhere in your project! Systematically disconnect wires from the micro:bit until everything turns back on. You may need to use a different USB port on your computer until the computer is restarted.
Going Further:
Could you challenge students to create devices to counteract the environmental impacts they have illustrated?
Could you challenge your students to use the micro:bit and their hardware available to go and measure the environmental impact they have illustrated somewhere on the school grounds?