Activity Name:
Get Your Heart Racing!
Grade Level:
7th grade (Can work for 9th-12th)
Time Required:
120 minutes
Expendable Cost:
None!
Group Size:
Groups of 2 - 3
Subject area:
life science, biology
Summary:
Students studying biology and life science are always keen to know how the body works - and it all comes down to bloodflow. Students are learning how the heart keeps the blood flowing using a 4 chamber pump that takes de-oxygenated blood (blood that’s been used) and pushes it through the lungs to re-oxygenate it. The 4 chambers must work in perfect synchronization and if the heartbeat is too fast or too slow, this can lead to problems. Tachycardia and Bradycardia are two medical conditions that mean a heartbeat that is too fast or too slow, respectively, and identifying these can help students understand how the body tries to maintain homeostasis. They are using buttons to try and return the heartbeat to baseline by engaging various “body systems” to return the heartbeat to a homeostasis. If they choose wrong, the heartbeat may get out of control!
Keywords:
circulatory system, homeostasis, heart function, blood, pumps, tachycardia, bradycardia, heartbeat
Educational Standards:
ISTE
- Empowered Learner
- Students leverage technology to take an active role in choosing, achieving and demonstrating competency in their learning goals, informed by the learning sciences.
- Knowledge Constructor
- Students critically curate a variety of resources using digital tools to construct knowledge, produce creative artifacts and make meaningful learning experiences for themselves and others.
- Creative Communicator
- Students communicate clearly and express themselves creatively for a variety of purposes using the platforms, tools, styles, formats and digital media appropriate to their goals.
NGSS
- HS-LS1-3
- Plan and conduct an investigation to provide evidence that feedback mechanisms maintain homeostasis.
- MS-LS1-3
- Use argument supported by evidence for how the body is a system of interacting subsystems composed of groups of cells.
Prerequisite Knowledge:
Please make sure you have done at least 1 or 2 Arduino lessons with your class beforehand. Ideally, Project 1A: Blinking an LED and Project 2B: Digital Trumpet from the SparkFun SIK 4.0 Guide. If you really want students to excel, completing the entirety of Project 2 from the SparkFun SIK 4.0 will greatly aid them.
Learning Objectives:
- Use variables to represent two quantities in a real-world problem that change in relationship to one another
- Systems may interact with other systems and their subsystems
- Negative or Positive feedback can stabilize or destabilize a system from Homeostasis
- Feedback mechanisms maintain a correct heartbeat
Materials List:
- 1 SparkFun RedBoard and Breadboard
- White paper to draw a heart on
- Colored pencils
- Tape (doesn't matter what kind)
- Marker to label parts
- 1 SparkFun RedBoard USB cable
- A laptop or computer with Arduino IDE installed
- 12 jumper wires (5 reds, 2 blue, 2 blacks, 1 yellow, 1 white ideally)
- 2 button
- 4 LEDs(2 Red and 2 Blue)
- 4 330 Ohm resistors (for the LEDs)
- 2 10K Ohm resistor (for the button)
- Starter code
- Full code
- Event trigger cards
Introduction / Motivation:
Today we are going to be getting our blood flowing! Mostly just to our brains with all the amazing learning we are about to do. Does anybody in the class know how blood is moved throughout our body? (Possible answers include “pumps”, “the heart”, “gravity” and more). Yes, the heart is responsible for moving our blood and it does pump but how does it do that? (Possible answers may be that it “beats” or “like a car” or others) The heart does beat, but the way it moves blood through the body is by pushing more blood behind it. This forces the blood to move forward because it is a “closed system.” A closed system (write this up on the board) is one in which the blood vessels are FULL of blood, so much so that any new blood would add pressure to the system. Blood taken away, reduces the pressure! So when the heart “beats” it pushes blood out of the heart and into the arteries, which then push blood down the line until blood that was just outside of the heart now enters the heart.
The way the heart “beats” is by using muscles! The heart is composed of muscle fibers that “contract” like a bodybuilder flexing their biceps. Think of it like having a balloon full of water and then squeezing the balloon. The pressure inside of the balloon increases, causing the water to flow out! But the heart is not just one big water balloon, it’s actually a series of 4 smaller water balloons. Some of these balloons are even connected to each other! In order for us to live a healthy life, these little balloons must keep their rhythm, or timing, perfectly. The heart has various systems that are meant to keep this timing in check - which is called “homeostasis.” (Write this on the board)
Homeostasis is a natural “resting” state of the body. Homeostasis is also incredibly different for everybody. If we all were to find our “resting” heart rate, which is where we are just sitting in a relaxed state, we would find that we all have different heart rates. There are certain systems in our body that will speed up our heart rate. Adrenaline, for instance, may be released when you watch a scary movie as your body is reacting and preparing itself for a lot of strenuous activity which would require a lot of oxygen. The faster your heart rate, the more oxygen that is being delivered to your muscles per minute. Knowing that, do you think athletes have a lower resting heart rate or a higher resting heart rate than others? (Answers will probably be higher) Not true! Theirs is actually lower, because their heart is trained, making it capable of pushing out more blood per contraction, which means it does not need to beat as fast! And meditation may slow down our heart rate.
So today, we are going to build a “heart” and add some buttons that will make our heart beat faster or slower based on external stimuli. These are called “feedback mechanisms” and some are positive (enhance an already changing state) and some are negative (returning the state to homeostasis.) We will be focusing on the positive loops to show how they change the heart rate!
Procedure:
Background
The teacher should be familiar with the systems of the body, and the code required to blink LEDs using the Arduino or SparkFun RedBoard. Lastly, they should understand the common pitfalls and troubleshooting tips below as it relates to how buttons function in the Arduino code environment.
Before the Activity
- Print out the cards that trigger an “event” that students will respond to with the correct button press.
- Gather materials into kits for students to use.
- Print out enough copies of “Starter code for Circulatory System display” so that each group can have their own.
- Print out 5 - 6 copies of “Circulatory System full code”.
With the Students
- Divide students into groups of 2-3 depending on class size and student familiarity with the curricular concepts and Arduino familiarity.
- Hand out kit materials.
- Explain how the heart pumps blood. Pull up anatomical picture of the heart - 4 chambers and the valves and explain to students that they will be creating a beating heart that is meant to keep the same timing as the heart. The heart consists of 4 chambers for a reason. The main “pumps” are the ventricles. These are the largest and can therefore push the most blood out. The right ventricle (left on the picture) is responsible for sending de-oxygenated blood to our lungs! The left ventricle (right on the picture) is responsible for sending oxygenated blood to our muscles and brain.
- So why shouldn’t our heart just have 2 chambers? Why do we need the other 2? (Possible answers might be “to hold more blood” or “create more force”) That’s right! The de-oxygenated blood from the body dumps into the right atrium (left on the picture) which then will pump it into the right ventricle. The blood that returns from the lungs, after being pumped there by the right ventricle, fills the left atrium. This is then pumped into the left ventricle. But what is important here is that the atrium and ventricles do not both contract at the same time. If they did, no blood from the atrium could make it to the ventricles. It is similar to trying to blow into a balloon to pump it up while somebody squeezes the balloon. Little air will move.
- Instead, the atrium contract first, pushing the blood into the ventricles, and then about 100ms (write this time on the board and label it “atrial contraction”) later, the ventricles contract, pushing blood to the lungs and arteries. Then there are “relaxation periods” which is similar to the heart needing time to relax and recover before pumping again. This lasts about 500ms. (Write this up on the board and label it “ventricular relaxation”) If we add these times together we get 600ms. Therefore, the heart would be beating more than once per second, actually almost twice per second. Does that fit into our normal range of a heart rate? How many Beats Per Minute would that be? (Correct answer is 120bpm) This is far above the normal range.
- So what are we missing? (Possible answers may be “the time it takes the blood to flow” or something of that nature) The correct answer is the time it takes the ventricles to contract! The ventricles typically take about 200ms to contract (Write this time up on the board and label it “ventricular contraction”.) Now our total time would be 800ms per heartbeat. How many would that be per minute? (Do the math on the board - 60s in one minute is 60,000ms, divided by 800ms = 75bpm) This is within our acceptable range! This is an example of how Engineers use math to check information against a known variable when it relates to engineering design.
To help explain this,
you can pull up a picture of an ECG/EKG heartbeat.
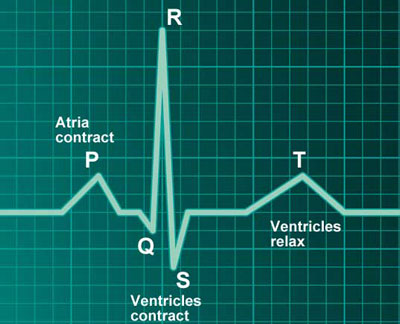 Photo Credit: TeachPE.com
- Now let’s create our heart and start our code! Play the youtube video showing the demo
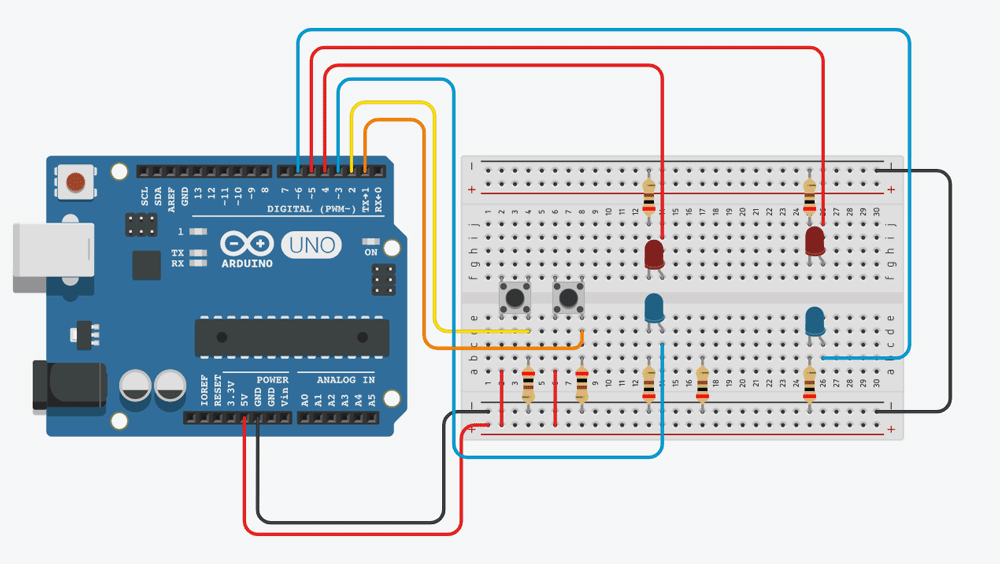
- Have one student of the group draw out a heart that can fit over top of 2/3rds of the Breadboard. I used a large index card for mine, so I could fold down the sides. Students should label the 4 chambers as well as the aorta and veins that flow into the heart.. See Fig 1

- Have the other students create the circuit from Fig 2 below. The rows do not need to match perfectly, and this should be verbally stated at least a few times. I simply created the circuit that will read the easiest, but they may need to move their LEDs and resistors based on the heart that the other student draws to have each LED be in the center of the chamber. The colors of the LEDs should match though - blue on the right side of the heart and red on the left.
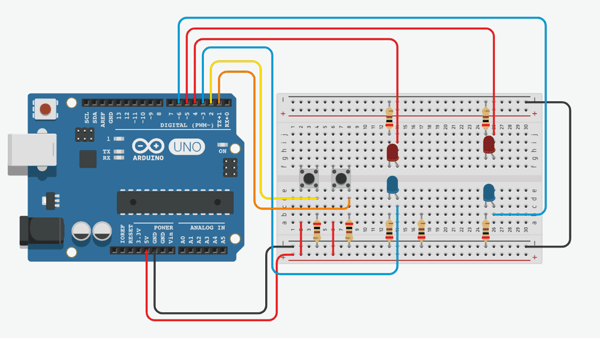
- The buttons may also be laid out in a different manner to allow for labels to be put above them, let the students have fun with this.
- Once the circuit is complete, students should begin writing the code for the baseline heart rate.
- Handout the “Starter code for Circulatory System display” doc to student groups so they can copy this code into their Arduino IDE. This code sets up their buttons as variables, delays as variables, and all of the LEDs and buttons as outputs and inputs respectively and will flash the two LEDs that correspond to the atria. In addition, it shows the logic loop to determine if a button has been pressed, and how to change the delays.
- Students must now add the rest of the code to try to flash the two ventricular LEDs and begin to setup delays that correspond to the times given above. I recommend they use the delay variables that have been created for them. They must insert them in the right places!
- Once students have a correct “resting state” heart rate sequence of flashing LEDs, they should get this checked off by you. It is okay if it is a bit faster or slower.
- Next, students should bring in the heart that was drawn and affix it to the Breadboard, over top of the correct LEDs. The heart should be labeled with the different atria and ventricles of the heart.
- Once this is complete, students need to start learning how to change the heart rate using the buttons. One button should simulate Adrenaline, and speed up the heart rate. No matter where students are in the process, it is usually a good idea to have the whole class participate in this short 5 minute lecture.
- Class, if Adrenaline is meant to stimulate the heart and speed up the rate, what does that do to the delays inside the Arduino program? (Correct answer is to lower the delay value. The less time in between parts of the program, the faster the program runs and the faster the loop will run.) Yes! So if the Adrenaline button is pressed (Write up “Adrenaline” and an arrow to the right) then the delay should go down (write “delay down”) but how much should it go down? And how do we make the delay decrease? Well, we will need to change the variable! So the logic of the program should be something like (Write this up)
“If (buttonpressed) {
Delay = delay-100;
}”
- Now, all delays must be changed, but keep in mind that if we do it exactly this way, there is a delay variable that will go from 100 to 0. That doesn’t make too much sense, and if we hit the button twice, that delay would now go to negative 100! And that just breaks the rules of Physics, so how about instead of subtracting a set amount, we divide our delay by 2?
- This will also apply to the button that is meant to slow the heart down. The other button will need to change the heart rate but instead of the delay being divided by 2, let’s multiply it by 2! And remember, a longer delay, means more time in between beats, resulting in fewer beats per minute.
- You’ll notice that there is already one If statement in there that checks for Adrenaline. However, you will still need to add the If statement for Meditation and work with the code to ensure your If statements are setup in the correct way.
- Students should now try to create this effect themselves. The final code can be found in the doc “Circulatory system full code” for anybody who is really struggling.
- Once their code is done, you can check their understanding of how these positive and negative feedback systems work by holding up one of the Event Trigger Cards and having students press the correct button in their display. You can also give verbal commands like “After the initial adrenaline rush, your brain begins to slow your heart down” and have them press the correct button (Meditation).
Figures:
|
Fig 1
These chambers will fit over the LEDs that are placed by students. One thing to watch out for is the tall jumper wires can get in the way, students may carefully bend the jumper wires to allow this to fit over top.
|
|
|
Fig 2
Circuit layout
|
 |
Troubleshooting Tips:
- One of the most common problems will be students not connecting components correctly in the circuit. Have them check this against the circuit diagram at least twice before trying to upload their code.
- Because we are actually using the 5V pin in this display, please make sure students unplug their RedBoards before making changes to the circuit. Components should never be changed out with power plugged in.
- Some students may have everything done correctly, but not see any changes when pressing the buttons. That is because there is a very small window for the button press. The way that Arduino works, it cannot detect a button press except for when it is looking for one. So with this code, it only looks to see if the buttons have been pressed at the start of the void loop (600ms after the LEDs for the ventricles light up.) Students may want to hold down their button to make sure it takes effect.
- If their LEDs are too fast or too slow, have students simply hit the “Reset” button on the RedBoard.
Going Further:
- There is a LOT more that can be done with Homeostasis. There are other physiological effects that take place when heart rate increases. Blood pressure can rise, breathing can quicken, and more. Heart rate may also rise due to a decrease in blood pressure from some kind of disease or illness or condition. Students can research these further and create a feedback system that is more robust.
- Students may also want to use switch cases instead of just looking for button presses. Switch cases are a great way to have a button press switch the program into a faster or slower mode, but limit the button from being pressed too many times. Students can research this and replace their if statements with switch cases to see how to make a more robust program!


.jpg)
